In today’s post I will explain the basic features, purpose and usage of the ASP.NET Core MVC framework and thus the underlying ASP.NET Core framework.
Basic features
ASP.NET Core is the default .NET Core web hosting framework. MVC is, as you already guessed, the Model-View-Controller-extension for it.
For the sake of simplicity I will call ASP.NET Core just ASP for the rest of this post. Easier for both of us. Just keep in mind that I don’t refer to old-school ASP.NET.
ASP.NET Core MVC will be Core MVC for the rest of this post.
ASP handles most of the nitty-gritty things that will break most people’s necks. I wrote a little php MVC micro-framework in php once and not after long started hating it and found all the inadequacies and clumsiness in it. That most likely won’t happen to you if you use ASP as it is meant to.
ASP & Core MVC handle things like routing, defining actions for different HTTP verbs (get, post, put, delete, etc.) and model binding for controller actions. Core MVC also handles things like translation, template rendering, custom error pages, authentication & authorisation with roles (different things!), session handling, etc.
In fact you don’t need any custom code to build a simple MVC site. You can directly plug your business logic into controller actions and templates.
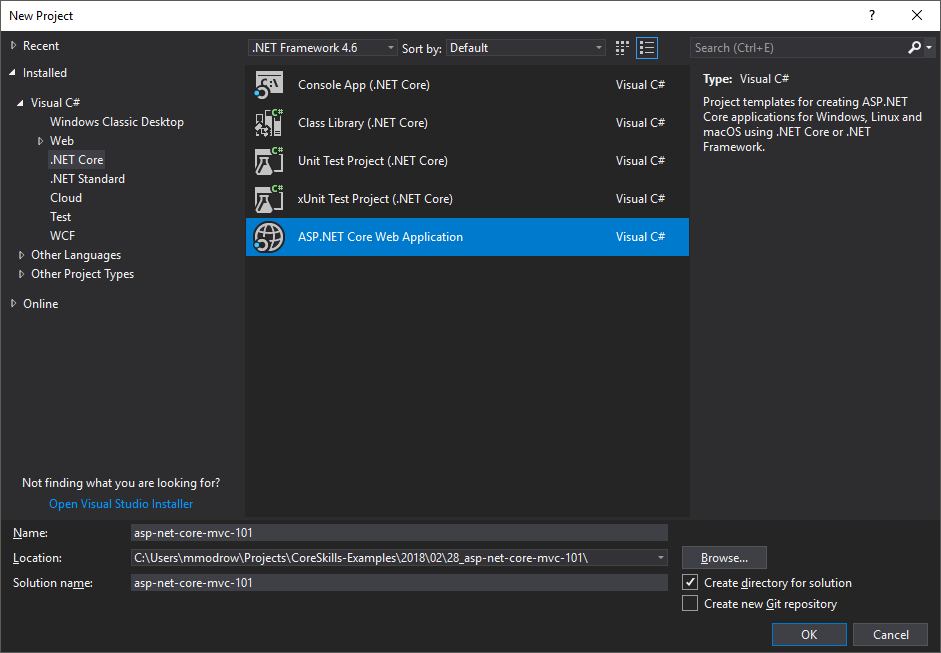
Visual Studio can help you even further. If you don’t know much about MVC or .NET you can use Visual Studio to create a new ASP.NET Core bootstrap app. Most likely you need to strip away a lot, but that gives a solid start to evolve from. I will explain how that works further down.
Dependencies
.NET itself
For now I will focus on our development environment which most likely will be Windows. In the future I will dive into the setup process on Linux.
.NET Core & ASP.NET Core are no native C# components, but frameworks. In order to develop for them the bare minimum you need to have is the .NET Core SDK. You should get the latest version, if you have no good reason not to do so.
Every machine that is supposed to run you application also needs the .NET Core runtime. While you are at it, also grab the latest version for you development machine as well.
The IDE
In theory that is all you need. You can edit your C# in any text editor you like and the .NET SDK can build, publish and run your app directly from the command line, but you really should pick up a proper IDE. There are great free ones nowadays!
Depending on your budget, application and personal preference you should also pick the right IDE. The prominent players are Visual Studio by Microsoft and Rider by JetBrains.
Rider is a subscription based paid IDE which is very good in terms of configurability and refactoring. It is especially useful for .NET Core, but somewhat pricey. There is a free trial anyway. You can check it out for a month and see if it’s worth the price tag for you.
Visual Studio has a free Community edition that has all features you will need for now. In the 2017 version of VisualStudio the professional edition only adds the CodeLens feature, which is mostly valuable on bigger code bases. The enterprise edition is effectively a Professional edition for bigger companies.
ReSharper by JetBrains is a VS-Plugin and a great way to give VS a big boost in functionality, but for now that is way too expensive for what we want to do.
Relevant parts of Visual Studio for .NET Core development
For now just get Visual Studio Community Edition in the latest version. When installing it asks you for specific components.
Pick the following for installing:
- .NET Core runtime
- .Net Framework 4.7+ SDK & targeting pack if you plan on doing non-UWP desktop applications as well
- .Net Portable Library targeting pack
- IIS Express if you don’t plan on installing the full IIS
- SQL Server Express (if you plan to work with databases and don’t plan to install full MSSQL)
- Dependency Validation
- NuGet package manager
- Static analysis tools
- C# and Visual Basic Roslyn compilers
- MSBuild
- All of the “Debugging and testing” category, except maybe C++
- ASP.NET and web development tools
- C# and Visual Basic
- JavaScript (if you plan to work on JS in VS, what I don’t recommend)
- Entity Framework 6 Tools (if you want to work with databases)
You could also check “ASP.NET and web development” and “.NET Core cross-platform development” to get most of that.
Congratulations! You now have everything you need to run your ASP.NET Core app. To run it outside of VS you might want to add IIS (express) to the mix, but for now we stick to running the app directly from VS.
Setting up a project
The easiest way to set up a ASP.NET Core project it to tell Visual Studio to do so. Create a new solution (that’s how Microsoft calls the overall construct that constitutes a whole code base). By default the first project in a solution has the same name as the solution itself (projects are what Microsoft calls a separated unit of code, that may be of a separate application type like Core, Standard, Framework, etc.).


You can either keep it where it is and how it is named or delete it afterwards and use the same process to create a new project by right-clicking a location in your solution in the Solution Explorer and choose Add -> New Project and go through the same steps as above. If you decide to delete it, you have to delete the folder in the actual file system by hand.
Keep in mind, that the solution structure does not need to align with the actual folder structure in your solution’s file system folder. You can structure your solution by using purely virtual “solution folders” that don’t show up in the file system. You also can add individual files to a solution.
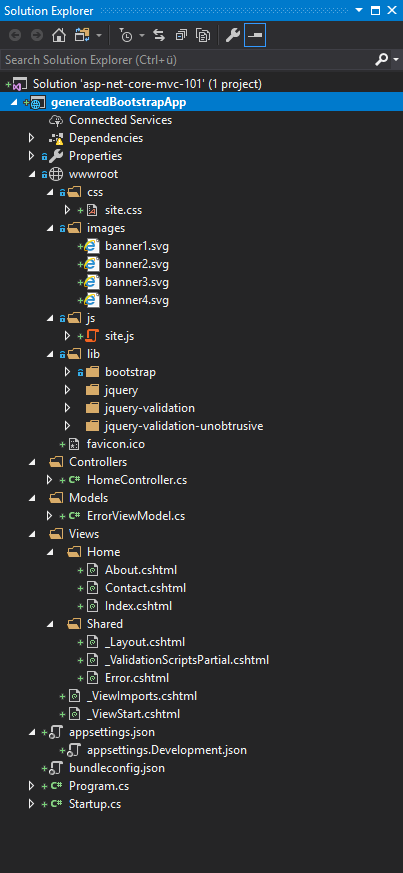
That creates a basic MVC application with all the most important pieces. To this day I prefer the masonry method – let VisualStudio create the basic application and then strip away all the unnecessary things. For me that are things like Bootstrap, jQuery, Bower and in most project I did recently the whole database connection. For you it might be the authentication part or something totally different.
Now you have a skeleton to put your very personal flesh onto.
You can find the full generated code in the example-repository on github.
Important files and folders
Before I let you go I want to tell you about the who is who in a ASP.NET Core app. You should know where to put what and why.
The solution file (*.sln)
There is one solution file per solution. It stores all the projects of a solution, the solution structure and what individual files and folders are attached where in the solution. If you don’t really dig into the nitty-gritty things you should never edit this by hand. Usually the IDE should handle all the changes to this file. That’s why Ride and VS both hide it in the solution view.
There is a debate, whether this should be versioned or not. I strongly am for versioning it, as it is important to express intent as a programmer. Also it makes onboarding new developers to your solution much easier.
The project files (*.csproj)
Every project in your solution has a project file. It keeps things like the project type (e.g. netcoreapp2.0 or netstandard2.0) as well as all the dependencies and required NuGet packages and their versions. What I said about the solution file is also true for the project file: don’t change it by hand if you don’t know what you are doing. You could break stuff and your IDE hides this from you for a reason.
program.cs
The program.cs file is the entry point to your application. This class usually contains only a static void Main method.
1 2 3 4 5 6 7 8 9 10 11 | public class Program { public static void Main(string[] args) { BuildWebHost(args).Run(); } public static IWebHost BuildWebHost(string[] args) => WebHost.CreateDefaultBuilder(args) .UseStartup<Startup>().Build(); } |
Visual Studio also creates a wrapper method for the builder pattern calls that build the necessary IWebHost. Here you can see how to first build a host using the Kestrel server, that comes integrated with ASP.NET Core (.CreateDefaultBuilder(args)) and then start it (.Run()).
You can also see this line:
.UseStartup<Startup>()This triggers the Startup-class when .Run() is executed.
Another important fact about the program.cs is, that it’s the place where the application configuration gets compiled from a bunch of json files.
By default those are appsettings.json and appsettings.<ENVIRONMENT_NAME>.json. To know what an environment is and what good appsettings.json is keep on reading. I will get to it.
startup.cs
The Startup class in this file does the heavy-lifting in terms of setting up your application and controlling its flow and everything else that is globally valid.
The class has two important methods: Configure and ConfigureServices
Configure is mostly dedicated to configuring and defining how to handle request. This refers to things like how to basically route, what to do with errors, registering middlewares that are supposed to run on every request or how to serve static files.
`ConfigureServices` defines configurations that do not refer to a single request. This is where authentication, database connections, globally available dependency injectables, etc. are set up.
appsettings*.json
The appsettings files hold your application configuration. This is great if you have different clients that run separate instances of your application want to be able to change fundamental behaviour without re-compiling your application.
As explained in the program.cs section you can add an arbitrary amount of json files to the loading process.
How you can add custom settings and use them will be the topic of a future post.
wwwroot
Everything in here will be publicly visible to the world, when you start your server up.
Usually in an ASP.NET Core application only CSS, JavaScript, images and downloadables will be located here.
I made it a habit to have a frontend-preprocessing directory outside of the VisualStudio project directories and copy the compiled assets to the wwwroot in my gulp pipeline. This also means, that usually I don’t version the content of wwwroot, as I usually don’t version compiled results. If you choose the same workflow you might want to add a .gitkeep file here.
Controllers
This is the place where all the Controller-classes reside. I don’t know of a particular technical reason that dictates this directory, but it is definitely a very good idea, to have them all in one place. It is an even better idea to make sure that place is not, where you have your business logic.
What they can do and how they work is worth a whole post on its own.
Views
This directory holds all your templates as *.cshtml files. By default controller actions will look at CONTROLLERNAME/ACTIONNAME.cshtml.
So if you are in the AuthenticationController class and call the Login action and don’t tell it where to take the template from, it first looks for a Views/Authentication/Login.cshtml
Models
Most of your data structures and business logic will most likely be somewhere in here, unless you put it in a separate project.
While very simple sites are totally fine placing everything here, once your site gets more complex I strongly advice creating separate netstandard2.0 or if needed netcoreapp2.0 projects and place them there. Who knows what the future will hold in store for your project…
web.config
Other than in the .NET Framework in ASP.NET Core is not hand-crafted. In fact there will be no web.config in your project’s source at all. It only gets created when running dotnet publish or publish from VS. The only relevant thing you need to know is, that this file is where the ASPNETCORE_ENVIRONMENT is saved when you run your app without the IDE e.g. via IIS.
ASPNETCORE_ENVIRONMENT
If you have different stages of your application in different stages of ripeness, as you should if you or your customer plan to make money on it, like development, staging and production, this is your feature! The environment usually is either set as an environment variable in the web.config of your application or by the IDE through the launch settings, which are stored in the projectpath/properties/launchSettings.json for VS. You can set it manually in the code if you wish by manipulating the IHostingEnvironment.EnvironmentName property. The IHostingEnvironment interface is dependency-injectable in ASP.NET Core and e.g. can be made available as parameter in Startup.Configure. I like to e.g. put options in to set the environment via command line parameters for dotnet run into the Program.Main
With this you can change certain features of your size for different instances/modes of your site. You could display un-minified css/js on development, show stack traces on errors only in development, add tracking to the production, add integration test target classes to staging, enable editor testing modes only on development and staging or similar things.
For the 3 default environments there are getters named IsDevelopment(), IsStaging() and IsProduction() on IHostingEnvironment to get the environment type without comparing strings yourself. In the view templates there is a tag type to control which markup is shown and what embedded logic is run in which environment(s) only.
1 2 3 4 5 6 7 8 9 | <environment include="Development">
shown in Development only
</environment>
<environment exclude="Development">
shown everywhere but in Development
</environment>
<environment include="Staging,Development,Client_Staging">
shown in Staging, Development and the custom environment Client_Staging
</environment> |
That are all the fundamentals to successfully start developing an ASP.NET Core MVC app.
One thought on “ASP.NET Core (MVC) 101”